Learn how to create logo designs using shapes, styles, gradients in Photoshop.
Logos are very important parts of web designing and they can be made with letters and graphics. Here we will learn to design simple logos using custom shapes in Photoshop.
Smart, Colorful and unique Bird Logo

Let's start designing the logo. It's very simple.
Step 1: Open a new file by clicking on File>Open.
Step 2: Create a new layer. Name it logo.
Step 3: Choose the  custom shape tool seen in the tools panel on the right. custom shape tool seen in the tools panel on the right. 

The above panel will appear.
Step 4: Click on the Shape drop down menu seen on the top toolbar. Click on the arrow and select Animals. Select style as Buttons. Look for the multicolor button which is there. Look for the bird which is in the banner and drag it to the canvas with the size you want.
Wow! Your nice colorful Bird logo is ready!
Bright Sun Logo

Follow the steps:
Step 1:Choose the  custom shape tool seen in the tools panel on the right custom shape tool seen in the tools panel on the right
. Click on the Shape drop down menu seen on the top toolbar. Click on
the arrow and select Nature. Select Fill pixels  (third (third
button seen in
the tools panel in the left). Look for the sun symbol which is there and drag it to the canvas with the size you want.
Step 2:Now click on magic wand tool  and select the sun. Now create and select the sun. Now create
a gradient. Select Gradient tool . Select Color harmonies2 . Select Color harmonies2
from the dropdown menu of gradient tool and chose the gradient which has orange to yellow gradient. Now click on the sun and drag from top to down. Your sun have the sun effect now.
Step 3:To make the text appear on top of the sun.
Click on  and the below panel will appear on top of the photoshop file. and the below panel will appear on top of the photoshop file. 
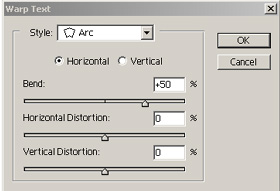
Select T and the below screen will appear. and the below screen will appear.
Warp Text Screen Click on style as Arc Say ok.

Now you can write your company name.
Your logo is ready!

Follow the steps:
Choose the  custom shape tool seen in the tools panel on the right. custom shape tool seen in the tools panel on the right.
Click on the Shape drop down menu seen on the top toolbar. Click on the arrow and select Ornaments. Look for the ornament which is
in the
banner of website header 2. Here give color as Black. Drag the s
hape to the canvas.
Easy isn't it?

Follow the steps:
 custom shape tool seen in the tools panel on the right. Go to custom shape tool seen in the tools panel on the right. Go to
Shape tool Click on this Shape drop down menu. Click on Click on this Shape drop down menu. Click on
the arrow and select Symbols. Look for the star symbol which is
in the banner of website header 2. Click on the color as #A83C56.
Drag the star in the canvas.
|

